If you’re like me and do a lot of lab testing for things like OSD and Windows autopilot with Intune, then you know you have to be able to monitor new Windows devices at the OOBE (out of box experience) screens, and that’s just not possible with an Azure VM. Hyper-V is the next logical choice, but now you’re dependent on a local machine that’s not easily accessible from everywhere—not to mention necessitating the availability of compute resources that are not easily extensible. Wouldn’t it be great if you could just spin up an Azure-based Hyper-V server that is accessible from anywhere and that you can easily scale up or down as needed for your VM environment? Sure, you can nest VMs in an Azure-based Hyper-V server, but the issue there is that they will not be able to pull an IP from Azure to get online or communicate with the rest of the world. This makes connecting to the autopilot and Intune services impossible and leaves Hyper-V the only real option for these kinds of testing scenarios. Or does it?
Recently, someone pointed me to some documentation about how to enable network connectivity for nested VMs hosted in an Azure-based Hyper-V server. Win! In addition to the Microsoft documentation, I also ran across an excellent blog post on this subject written by Doug Silva, a fellow Premier Field Engineer, that, to be honest, was much more helpful than the official docs. Sorry docs team 🙁
As I was going through these references trying to figure out how to unlock the magical powers of enabling communication with nested VMs in Azure, I kept looking for additional examples and information to help me understand what was going on. It’s with that spirit that I’m providing you with my example here. I hope it helps.
Let’s get started.
Networking
First things first. You’re going to want to have your networking set up in advance of creating the Hyper-V host VM. You’ll understand why in a bit. You’re going to need one VNET with two subnets that you configure in Azure and one that you will use for your Hyper-V server’s virtual switch. You’ll probably also want to start all this off in a fresh resource group.
Here’s an example of how I set mine up:
- New resource group called corp.jeffgilb.com since this will host some of my hybrid Azure AD joined Windows VMs. When I create labs like this, I always name the resource group the name of the domain space and put everything to do with it all in one place. This makes it easier for me to find and delete everything at once when I’m done.
- New virtual network called, very unimaginatively, Hyper-V-Lab-VNET with address space of 10.0.0.0/16.
- Two subnets were then configured for the VNET in Azure like so:
- LAN with address space of 10.0.1.0/24 (how Azure VMs talk to the host and nested VMs)
- NAT with address space of 10.0.2.0/24 (how the host VM provides connectivity for hosted VMs)
- Later, I’ll create a Hyper-V virtual switch that will use the 10.0.3.0/24 address space, but Azure could not care less about it so nothing to see or do here for that subnet. This will also be the address space used by DHCP to provide IP addresses to the Hyper-V hosted VMs (starting the scope with 10.0.3.2/24). This last subnet for the switch and DHCP is not set up in Azure, but rather on the host server itself.
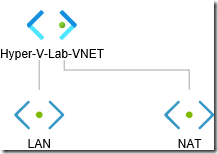
Here’s a pretty basic picture of the Azure virtual network in its infancy that adds little value, but looks cool:
Create the host VM
With networking all sorted, you can now create your host VM. Make sure to create it in the same resource group that houses the VNET you just created. Also, size matters when it comes to using Hyper-V on Azure-based VMs because only certain VM sizes support nested VMs. Look for *** (which means Hyper-threaded and capable of running nested virtualization) in the list of available sizes on the Azure compute unit (ACU) page. I’m using a Dv3 and Dsv3-series VM running Windows Server 2019 Datacenter if you’re curious. Specifically, a D4s_v3 which gives me 4 vCPUs, 16GB of memory, and premium disk support. More than enough compute power for my needs and at a reasonable price if I don’t leave it running all the time. Speaking of, don’t forget to enable auto-shutdown during this process.
When it comes to data disks, well you’re probably going to want one on your VM host if you’re going to be creating a few VMs. Trust me when I say that you’re going to want to add a data disk with Premium SSD support unless you just like watching VMs run in slow motion on basic HDD drives. If you feel compelled, now is the time to create and attach a data disk while you’re creating the VM. After a day or two of trial and error, I found that a 256GB Premium SSD disk is plenty big enough for the kinds of things I’ll be testing on lightweight Windows desktop VMs and I’m running about 10 on this server. I might also create some VMs on the operating system drive disk as well for things like autopilot testing with temporary VMs that I can delete later to regain OS disk space. Keep in mind that the price goes up quickly as you increase storage space. This 256GB data disk of mine only runs about $38 a month, but you can add much, much larger ones if you have the need to later.
When you get to the networking tab, pay close attention. This is where your networking pre-work is going to pay off. While creating the VM, make sure that you select the NAT subnet for the network interface:
After the VM is created, some additional networking magic will need to be done, including adding a second NIC connected to the LAN subnet. For now, just make sure the NIC on the VM you’re creating is connected to the NAT subnet. This is so that your nested VMs will be able to talk to the outside world later. Now, moving on.
Next, the management tab is where you can configure the auto-shutdown behavior for the VM. I highly suggest you do this. It has saved my bacon more times that I like to admit. After configuring auto-shutdown you can configure advanced settings and tags. I usually click through to review and create the VM. When the VM is successfully created, it will be running. Shut it down. Make sure you keep the public IP address if you’ll be using it to remote into later.
TIP
I use the Windows Admin Center from my local PC to manage Hyper-V running on this server so I use a static public IP.
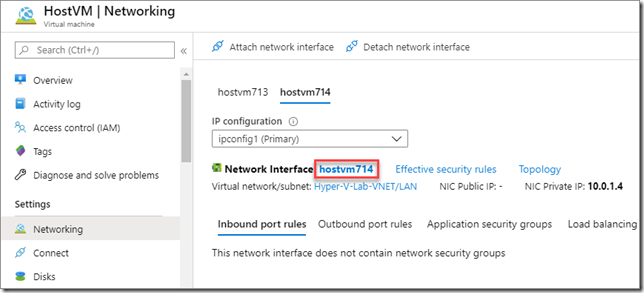
When the VM is stopped and deallocated (not the same thing), get into its networking settings and add a second network interface. Azure named my first NIC hostvm713 so I just called the second one hostvm714. You can call it whatever you want really. If you don’t know how to do this, select Attach network interface and then Create network interface. Make sure this one is connected to your LAN subnet. After you’ve created it, you go back to Attach network interface to, well, attach it. Next, you need to enable IP forwarding. Make sure you’re on the right tab and click the network interface name:
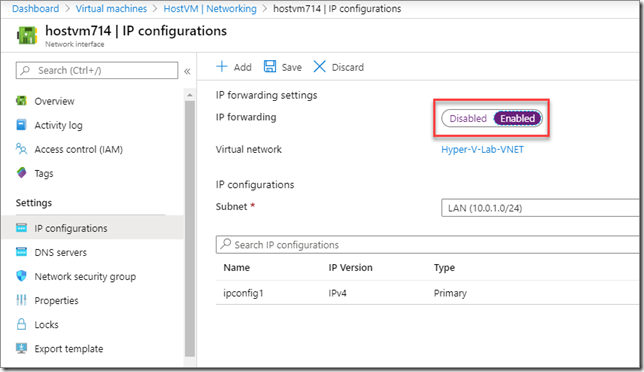
Next, select IP configurations and enable IP forwarding. Save those changes and you’re all set. While you’re in the neighborhood, you should also go down to Network security group and associate the same NSG on the NAT interface to this new LAN interface.
TIP
I set the LAN internal IP to be static and add the LAN internal IP to the Azure VNET as a custom DNS server along with the two free Google public DNS servers. This way Azure VMs can join my AD DS domain without having to be nested VMs.
Gentlemen (and ladies), start your VMs.
At this point, I stopped and promoted my VM to a domain controller. You don’t have to. I want a DC here so that the VMs I create can be joined to the local domain via autopilot and hybrid Azure AD join enrollment profiles. So, if you want your nested VMs to be able to join a domain, you can make your host VM a domain controller too or just put a domain controller VM on the VNET later. I prefer as few VMs running in Azure as possible because I’m cheap.
So, either promote your VM to a domain controller, join your VM to an existing domain, or don’t. Whatever, let’s keep going.
The next first thing that you’re going to want to do is rename your network connections. This will help you later. Believe me. Run an ipconfig command to see what NIC is on what subnet (your NAT or LAN subnet) and then rename them as NAT or LAN respectively. Also, these interfaces will be referenced throughout the rest of this post so if you don’t rename them now, you’ll most likely get confused later on. They should look something like this before continuing:
Install the required services
Next we need to add the server services that make all the magic happen. These being:
- Hyper-V. It’s hard to be a Hyper-V host without Hyper-V enabled.
- DHCP. This is how those nested VMs will pull IPs to do things like autopilot, join a domain, get on the internet to see the world, etc.
- Routing and remote access. This is necessary so that the host VM will be able to leverage NAT to provide connectivity (in and out) for the nested VMs. If you’re going to do this in production, check with your account team/support. I don’t believe using RRAS like this is technically supported, but it works and hey, it’s my lab so I’m going for it.
I’ll make this easy on you, just run these PowerShell commands on the Hyper-V host VM (all one line):
Install-WindowsFeature -Name Hyper-V,DHCP,Routing -IncludeManagementTools -Restart
The VM will restart and that’s OK.
Configure Hyper-V networking
Now that Hyper-V is available on the host server, two things need to happen: Hyper-V needs to know about the subnet the nested VMs should be created on and DHCP needs to know what IPs to hand out as those VMs start asking around for one on the mean streets of your Hyper-V virtual switch network.
Remember that third subnet that wasn’t configured in Azure? It’s time to put it to work. In my example, the nested VMs are going to be on the 10.0.3.0/24 subnet like we talked about at the beginning of this post. You’ll use the first IP in that range as the default gateway for the nested VM switch and the remainder of it for your DHCP scope. Replace my example IP settings below with your own subnet information and run these PowerShell commands to create the Hyper-V switch the nested VMs will be connected to (the second command should be all one line):
New-VMSwitch –Name “Nested VMs” -SwitchType Internal
New-NetIPAddress –IPAddress 10.0.3.1 -PrefixLength 24 –InterfaceAlias “vEthernet (Nested VMs)”
Create the DHCP scope
With a new internal network for Hyper-V to use, it’s time to get DHCP into the game. Use the same address space you used for the virtual switch (starting at 2 since the switch is using the first IP) and be sure to include a valid DNS server. There are tons of free ones out there, but I always use Google’s. Mostly because they’re easy to remember (8.8.8.8 and 8.8.4.4).
Use these commands to create the DHCP scope that will provide IPs for devices attached to your new virtual switch (again, each of these commands should be all on one line):
Add-DhcpServerV4Scope -Name “Nested VMs” -StartRange 10.0.3.2 -EndRange 10.0.3.254 -SubnetMask 255.255.255.0 –Description “DHCP scope for nested Hyper-V VMs.”
Set-DhcpServerV4OptionValue -DnsServer 8.8.8.8,8.8.4.4 -Router 10.0.3.1
TIP
If you’re going to be joining these VMs to an Active Directory domain as part of your testing, you might want to sneak one of your domain’s DNS server IPs in there in addition to those free DNS servers.
With Hyper-V and DHCP sorted, you can now create a Hyper-V VM attached to the virtual switch and it will successfully pull an IP from DHCP. Unfortunately, these VMs still can’t talk to anyone. It’s like 1995 all over again and no one has an AOL CD to get online. Weird flashback.
Let’s move on to most likely unsupported territory and get these VMs connected to the outside world. And without a modem and the ear-piercing screams of robots being tortured, shall we?
Time to configure RRAS
Open your Hyper-V host’s new Routing and Remote Access console from Windows Administrative Tools. Your service hasn’t been configured or started yet so you’ll see a red down arrow by your server name. Just right-click on your server name and choose Configure and Enable Routing and Remote Access. In the Routing and Remote Access Server Setup Wizard, select Custom configuration and then NAT and LAN routing, and finish the wizard to start the service.
Now, you’ll probably now see something like this:
RRAS is enabled, but it’s not really doing anything because we haven’t told it what interface to use. Right-click NAT under IPv4 and select New Interface. Select your NAT interface, click OK, and then enable both options for Public interface connected to the Internet and its child option to enable NAT on the interface.
Your VMs can now access the internet and can now get to https://www.bing.com. If that’s all you need, you’re done. Go grab an .ISO and get to building VMs to your heart’s content.
I feel like I’ve gone too far to stop now so let’s keep going. The end is in sight, but there’s still two more networking tasks to be done.
To allow the nested VMs to talk to non-Hyper-V, Azure-based VMs on same VNET you created in the beginning of all this, you must now configure a few static routes in RRAS. Remember, your Host VM has two NICs and kind of a split personality at this point. How does it know what network traffic is for itself and what traffic goes back and forth to nested VMs? Here’s how to let it know.
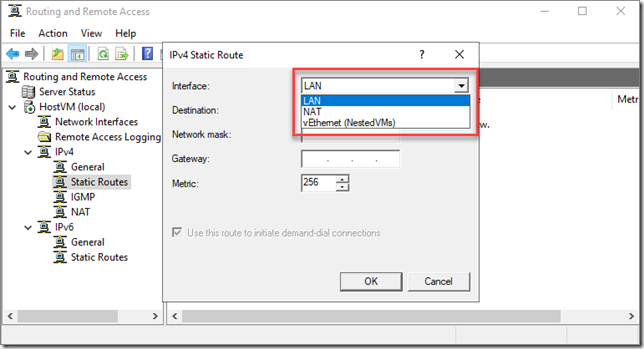
Still under IPv4, right-click Static Routes, and select New Static Route. You’ll have a few interface options to choose from.
The first, NAT, should be the host VM’s primary NIC—it’s first one. Here’s where you tell the host what network traffic is destined for itself and not the compute resource sucking VMs contained within its bowels. The next, LAN, is used to configure the host to pass traffic to and fro with the hosted VMs and the rest of your Azure VNET. The nested VMs interface is just for Hyper-V so that one can be ignored at this point. Configure these interfaces according to the subnets you’ve created earlier.
Remember my VNET and subnet address spaces? Noi? OK, here’s a refresher:
- The virtual network is called Hyper-V-Lab-VNET with address space of 10.0.0.0/16.
- Two subnets were then configured for the VNET in Azure like so:
- LAN with address space of 10.0.1.0/24
- NAT with address space of 10.0.2.0/24
Now, this gets confusing, but the important thing to think about here is that the VNET has a /16 subnet mask and the subnets end in /24. That means we need to configure the routes so that anything going to a /24 is first picked up by the host and anything destined anywhere else, including our LAN subnet, will be dialing a number through the LAN interface to somewhere in the /16 area code. Clear as mud? In my example, these routes are configured thusly:
|
Interface |
Destination |
Network mask |
Gateway |
Metric |
|
NAT |
10.0.0.0 |
255.255.255.0 |
10.0.0.1 |
256 |
|
LAN |
10.0.0.0 |
255.255.0.0 |
10.0.1.1 |
256 |
Cool. Nested VMs can now talk to Azure VMs, but what about the other way around?
Configure User-Defined Routes in Azure
The last step in the process is to configure user defined routes in Azure. This will let Azure VMs to communicate with the nested VMs. In my example, I’ll be routing anything looking for a 10.0.3.0/24 address (my nested VM Hyper-V virtual switch) to my LAN NIC address (not LAN subnet address space) of 10.0.1.4/24. Run IPCONFIG on your host VM to see what your LAN IP is to use here. You’ll also need to use your own resource group, VNET, and subnet names.
To get this done, head to the Azure portal, log into your tenant, and start up a command shell instance to run commands looking something like this (you might need to change everything in red here):
# Route Table
$routeTableNested = New-AzRouteTable `
-Name ‘nestedVMroutetable’ `
-ResourceGroupName corp.jeffgilb.com `
-location EastUS
# Define the route connecting nested VMs to LAN
$routeTableNested | Add-AzRouteConfig `
-Name “nestedvm-route” `
-AddressPrefix 10.0.3.0/24 `
-NextHopType “VirtualAppliance” `
-NextHopIpAddress 10.0.1.4 `
| Set-AzRouteTable
# Associate route table with the VNET’s LAN subnet
Get-AzVirtualNetwork -Name Hyper-V-Lab-VNET | Set-AzVirtualNetworkSubnetConfig `
-Name ‘LAN‘ `
-AddressPrefix 10.0.1.0/24 `
-RouteTable $routeTableNested | `
Set-AzVirtualNetwork
Let’s see if it works
Now, if you hop on an Azure-based VM configured to use your VNET, you should be able to ping both the Hyper-V host (10.0.1.4 in my example), and a nested VM (10.0.3.2 for me) and vice-versa. You will probably need to turn off the firewall on the nested VM for this to work:
And that’s it. You should now be able to configure an Azure-based Hyper-V host VM to birth fully functioning VM progeny to the limits of your compute resource dreams.
The next logical step is automating the creation of those VMs to continue my Windows autopilot testing. That will have to wait for the next post.
You’ve seen my blog; want to follow me on Twitter too? @JeffGilb
![]()


